IBM Server Site

IBS Home Up

http://www.homenethelp.com/vpn/router-config.asp

Configuration Overview

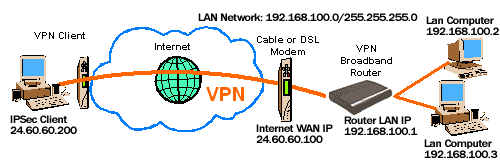
In this example, we will be working with two computers and a VPN Router. Throughout the screen shots and the rest of the article, I will refer to the following IP address. Please write them down or print them for reference, it will help you understand the rest of the article.
Home WAN IP: 24.60.60.100 (from your ISP)
Home LAN Router IP: 192.168.100.1
Home LAN IP Network: 192.168.100.0: Subnet 255.255.255.0
Computer on Home LAN: 192.168.100.2
Remote (friends) computer on the Internet: 24.60.60.200

Notes about IP Your Configuration
It is wise to change the IP Schema of your home network from the default your router configures. This will aid you in connecting multiple networks together - especially two VPN routers of the same brand. Often the IP Schema is 192.168.1.0/255.255.255.0. All you need to do is change the second from the last number (octet) to something higher than 2 and less than 255. In this example, I made my LAN 192.160.100.0/255.255.255.0. This step is not totally necessary but it could save you some routing headaches later.
It is also wise to convert your computers over to STATIC IP address instead of dynamic IP address. If your computers have dynamic IP address, you will not know what the IP address is of the computer you want to connect to from the road. One day it might be .2 the next day it might be .5. Again this is not necessary, but it will save you headaches later.
Static IP Schema Example
LAN Computer 1
IP Address: 192.168.100.51
subnet: 255.255.255.0
Gateway: 192.168.100.1 (router address)
DNS: 192,168.100.1 (router address again)
LAN Computer 2
IP Address: 192.168.100.52
subnet: 255.255.255.0
Gateway: 192.168.100.1 (router address)
DNS: 192,168.100.1 (router address again)
etc...
** Linksys router firmware should be updated to at LEAST v1.40.3
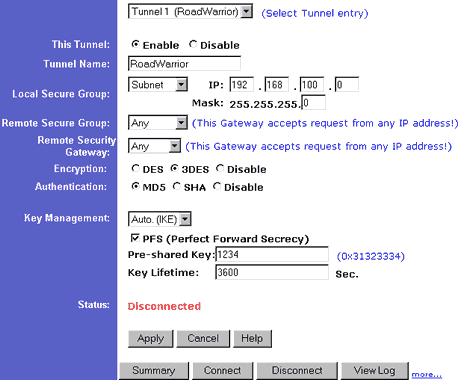
From the VPN Screen of your Linksys BEFVP41 router, configure a VPN tunnel as shown in the picture below. You can name this tunnel anything you want - the name will not appear anywhere else - it is unimportant.
Be sure to set the Local Secure Group to the LAN network as show. This will give the IPSec tunnel access to all of your LAN computers.
The Pre-Shared key is VERY important. This key is the 'password' for your whole network. It will be given to anyone that needs VPN connectivity. A single word from the dictionary should never be used since hackers use dictionaries to break in. The key should be at least 8 characters long. The key shown (1234) is a VERY BAD key. I am using it only for diagnostics.

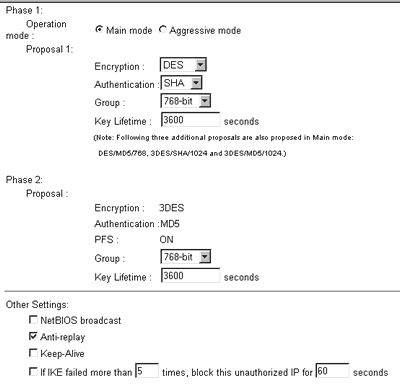
Down by the View Log button, there is a 'more' link. Press it and make sure it looks like the picture below.

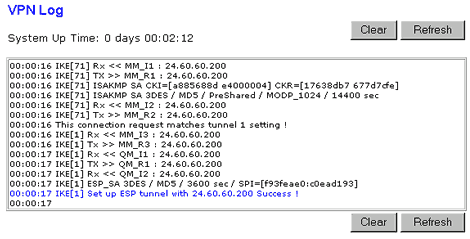
Your router is now ready to receive incoming VPN Connections! The picture below shows a Linksys LOG of a successful incoming VPN connection. Please note: you will not be able to see a log like this till you try connecting.

SSH Sentinel is my IPSec client of choice - primarily because it is free for non-commercial use. This beats the heck out of paying $150 per license for some of the other clients out there. SSH Sentinel however is not the most intuitive client on the market. Come to think of it, all IPSec client software programs are a little hard to set up for beginners.

Version 1.2 or 1.3?
When this tutorial was written, SSH Sentinel 1.3 was in BETA. I had a few problems with it retaining its settings so this tutorial was written with version 1.2. If you have version 1.3, click here for v1.3 instructions .
Where does it go?
SSH Sentinel should be loaded on the REMOTE computers - the computers on the Internet that you want to have access to your LAN. SSH Sentinel is a free download for non-commercial use and can be found here.
The Install
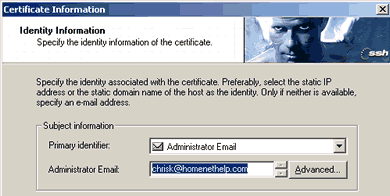
When you see the following screen, select 'administrator email' and type in your email address
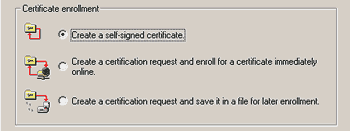
Next, select 'self-signed certificate'
Key Configuration
Once installed, you will need to enter the 'POLICY EDITOR'. It can be reached from the start menu or by right clicking the blue SSH Sentinel icon in your task bar.
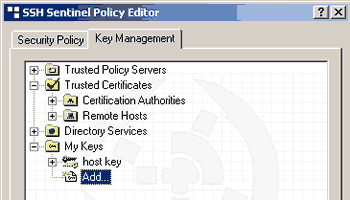
From the SSH Sentinel Policy Editor, Select the Key Management tab and add a new key.
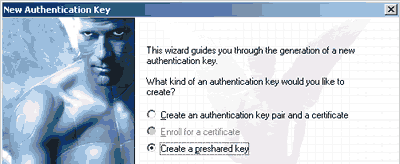
Select create a preshared key when you see 'Mr. Buff'
Create a name for the key and type in the exact key you typed into your router. Again, this key should be at least 8 characters long and should not be a single word from a dictionary
You have now created a shared key. Now to create the VPN Connection.
VPN Tunnel Config
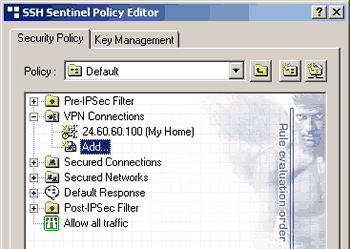
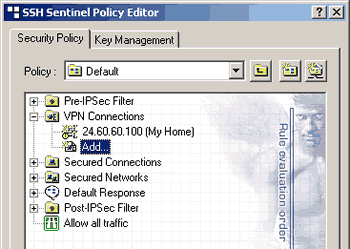
Now, from the Security Policy screen, add a new VPN Connection. Note: The picture below shows one that was already added. You should only have the add button. The folder layout will look a little different in v 1.2 but that's ok.
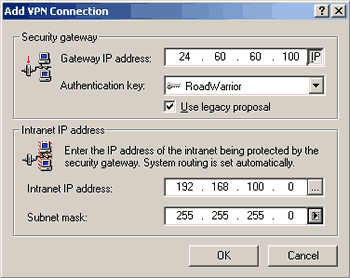
Type in the VPN Routers WAN address. You will need to click the 'IP' button to the right if you are typing a static IP address. Next, select the shared authentication key you just created and check the 'use legacy proposal' button. Last, type in the IP schema of the LAN network that is BEHIND the VPN router. and click OK.
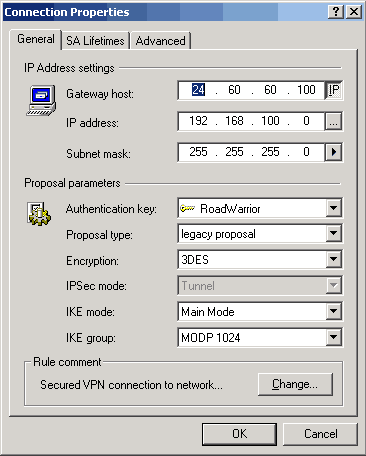
These are the PROPERTIES of the new VPN connection we created. Be sure yours looks like this.
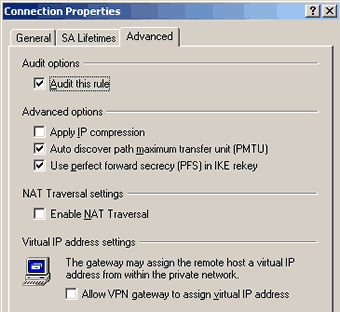
Select the ADVANCED tab and make it look like this. BE SURE TO SELECT THE 'Use Perfect Forward Security' checkbox or it will not work! If the remote client computer is behind some kind of NAT based router or firewall, check the 'Enable NAT Traversal' checkbox too.
Congrats! You have confiigured the SSH Sentinel software. Now we must do a little ROUTING to get everything working.

IBS Lumber and Building Material Software Copyright © 2006 IBS Lumber Software Inc (TM)
Last modified: November 7, 2011

IBS Sales & Support 888-640-1252
Main Office 888-640-1252
Fax IBS 877-712-8937

All pages contained in this support website are not intended for general public distribution. Any material here can be considered private, confidential with various copyrights and restrictions against public release. You 'the browser' cannot legally release this information for general public distribution.

remote support: http://www.gotomeeting.com | remote support download program